Voting Wallet Setup
Learn how to set up your digital wallet or wallets to vote on MakerDAO governance
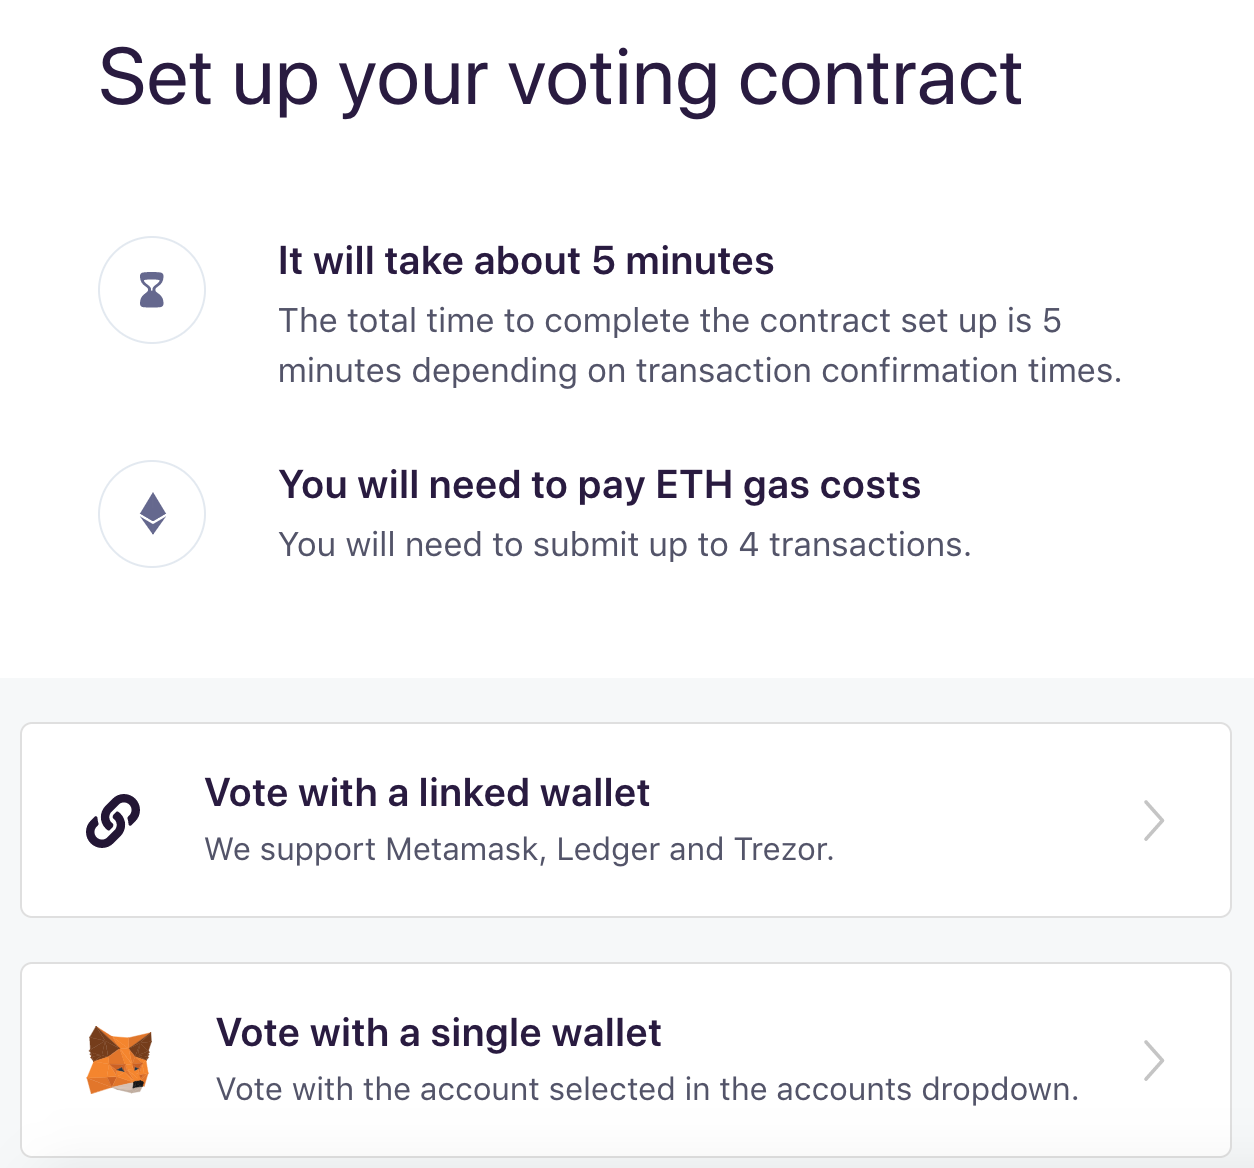
Maker (MKR) token holders may set up their Voting Contract with a single hot or cold wallet, or, as a linked wallet.
The linked wallet provides a more secure setup enabling users to vote with a hot wallet while their MKR remains stored on a cold wallet.
Linked-Wallet Setup
The Linked Wallet Voting Contract can be set up using hardware wallets like Trezor or Ledger, paper wallets using SETH, or two MetaMask Accounts.
Setting up a Voting Contract is a one-time action as long as the same wallet or wallets are used in voting.
This guide uses Trezor as the cold wallet and MetaMask as the hot wallet. The process is similar for other cold wallets.
See our guides to using other wallet types:
Setup with Trezor + MetaMask
Please have the Trezor wallet ready and the MetaMask browser extension installed and running. Log in and make sure the appropriate MetaMask account is selected.
Navigate to the Governance Portal. Before setting up the contract, connect Trezor and MetaMask.
1
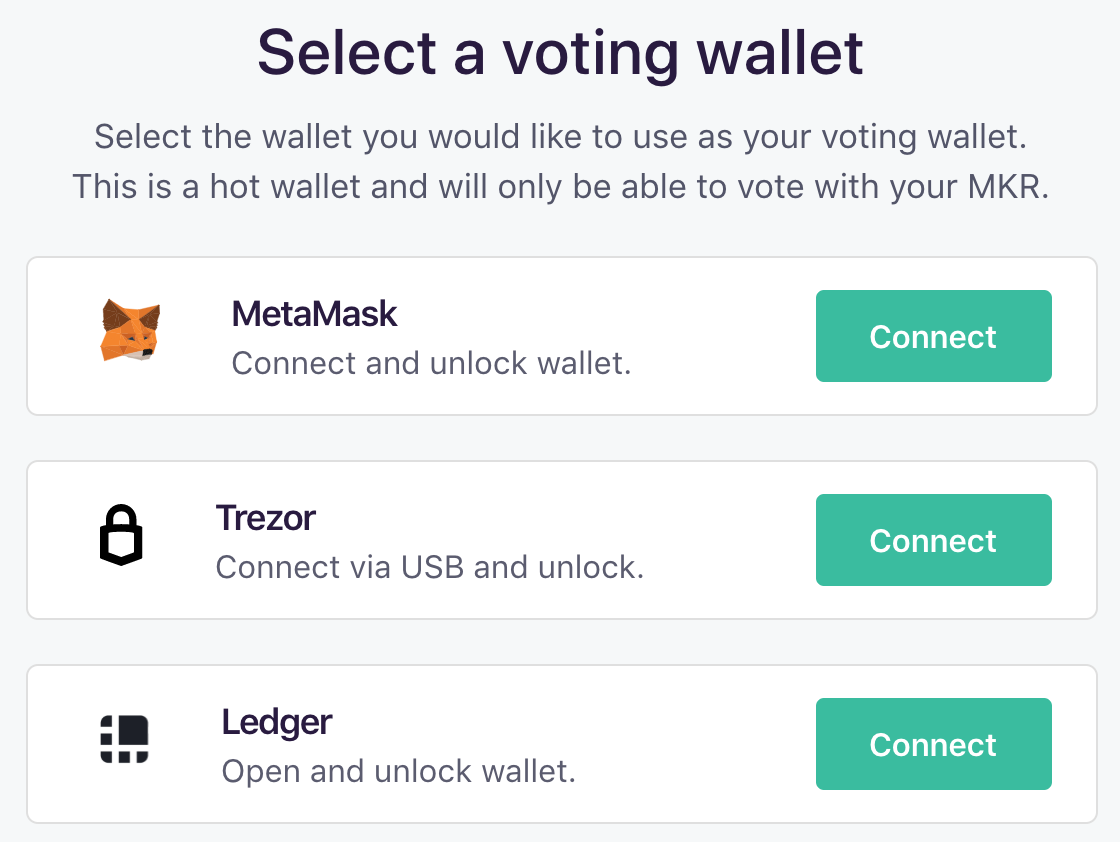
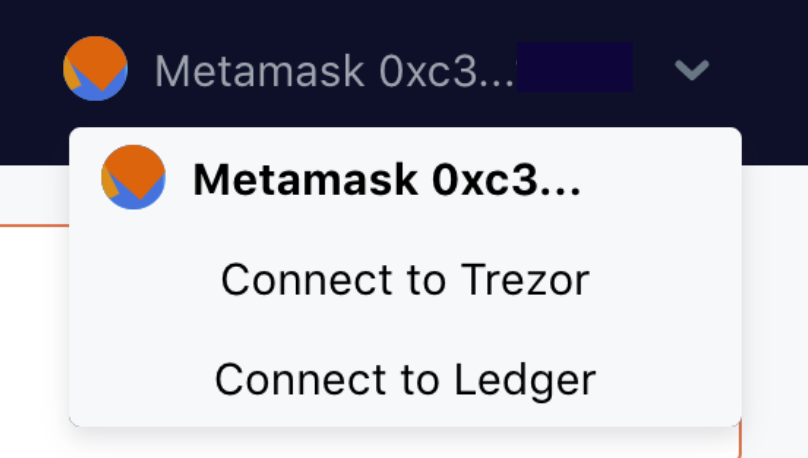
Connect MetaMask
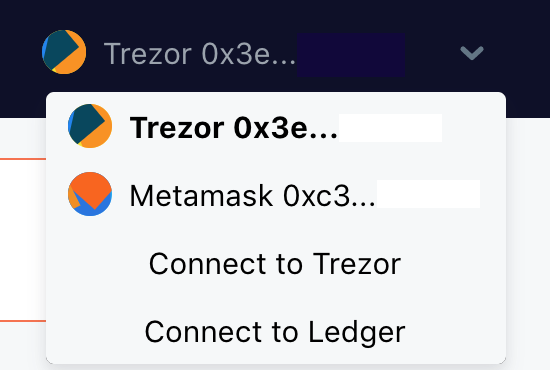
Find the “Accounts” drop-down menu on the right side of the top banner. If MetaMask is active, the current account will show as an available wallet. Make sure this is the correct account and select it to use as the hot wallet.

2
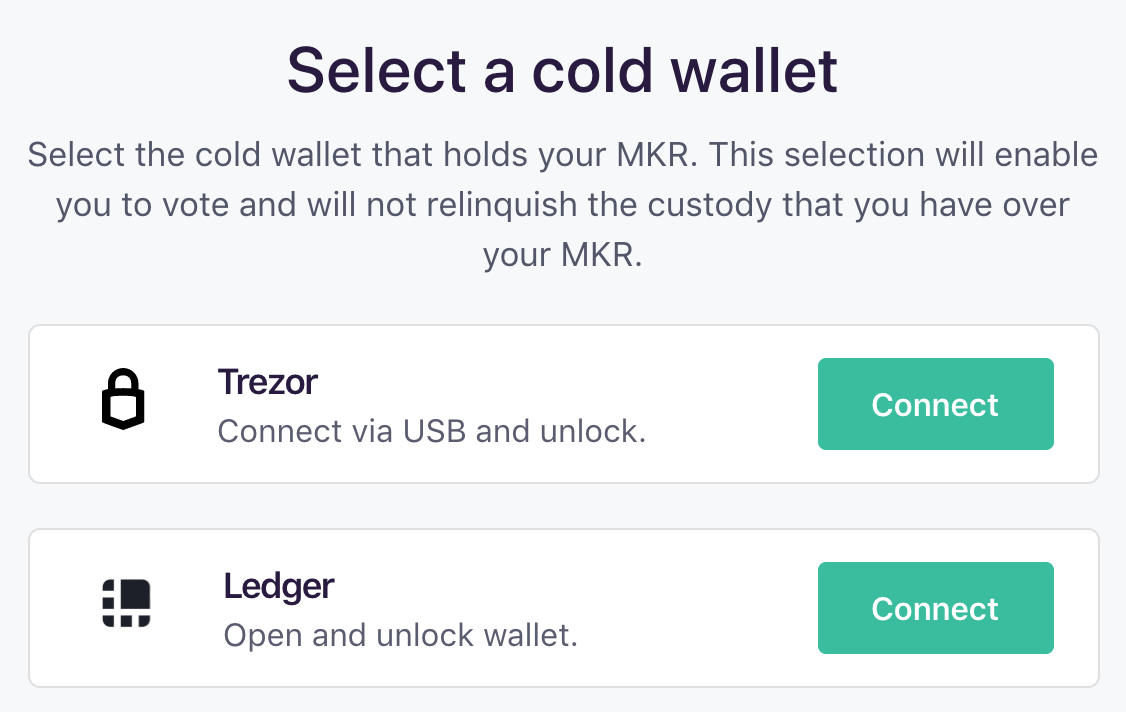
Connect Trezor
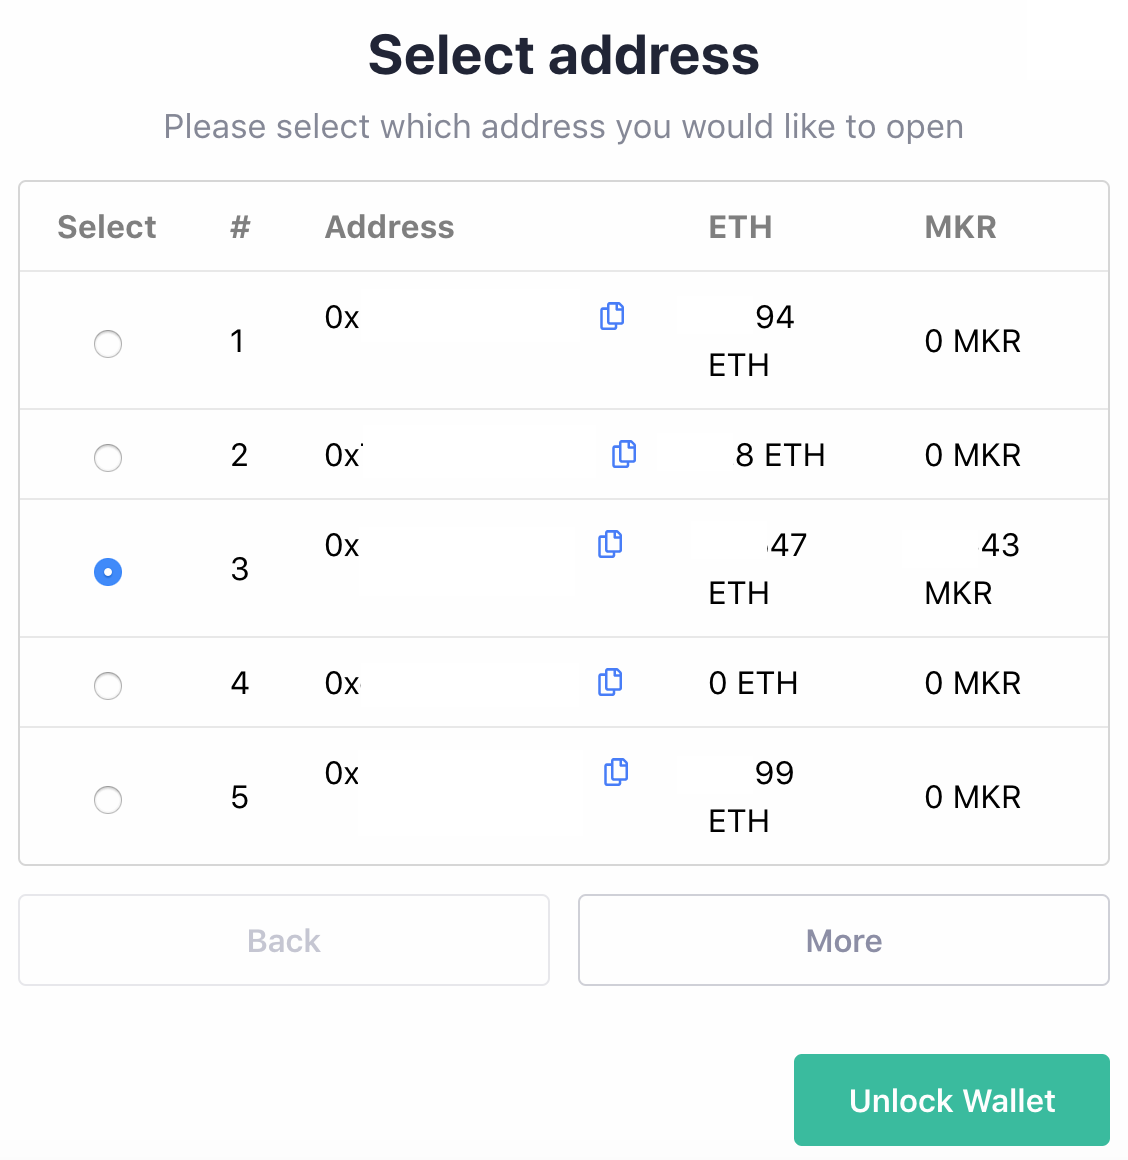
In the “Accounts” drop-down menu, select “Connect to Trezor.” The Trezor wallet must be plugged in for it to show up. Follow the steps to enter the Trezor’s pin and passcode. When prompted, select an address with MKR to use as the cold wallet. Click “Unlock Wallet.”


The “Accounts” drop-down menu will now show that both MetaMask and Trezor are connected.

3
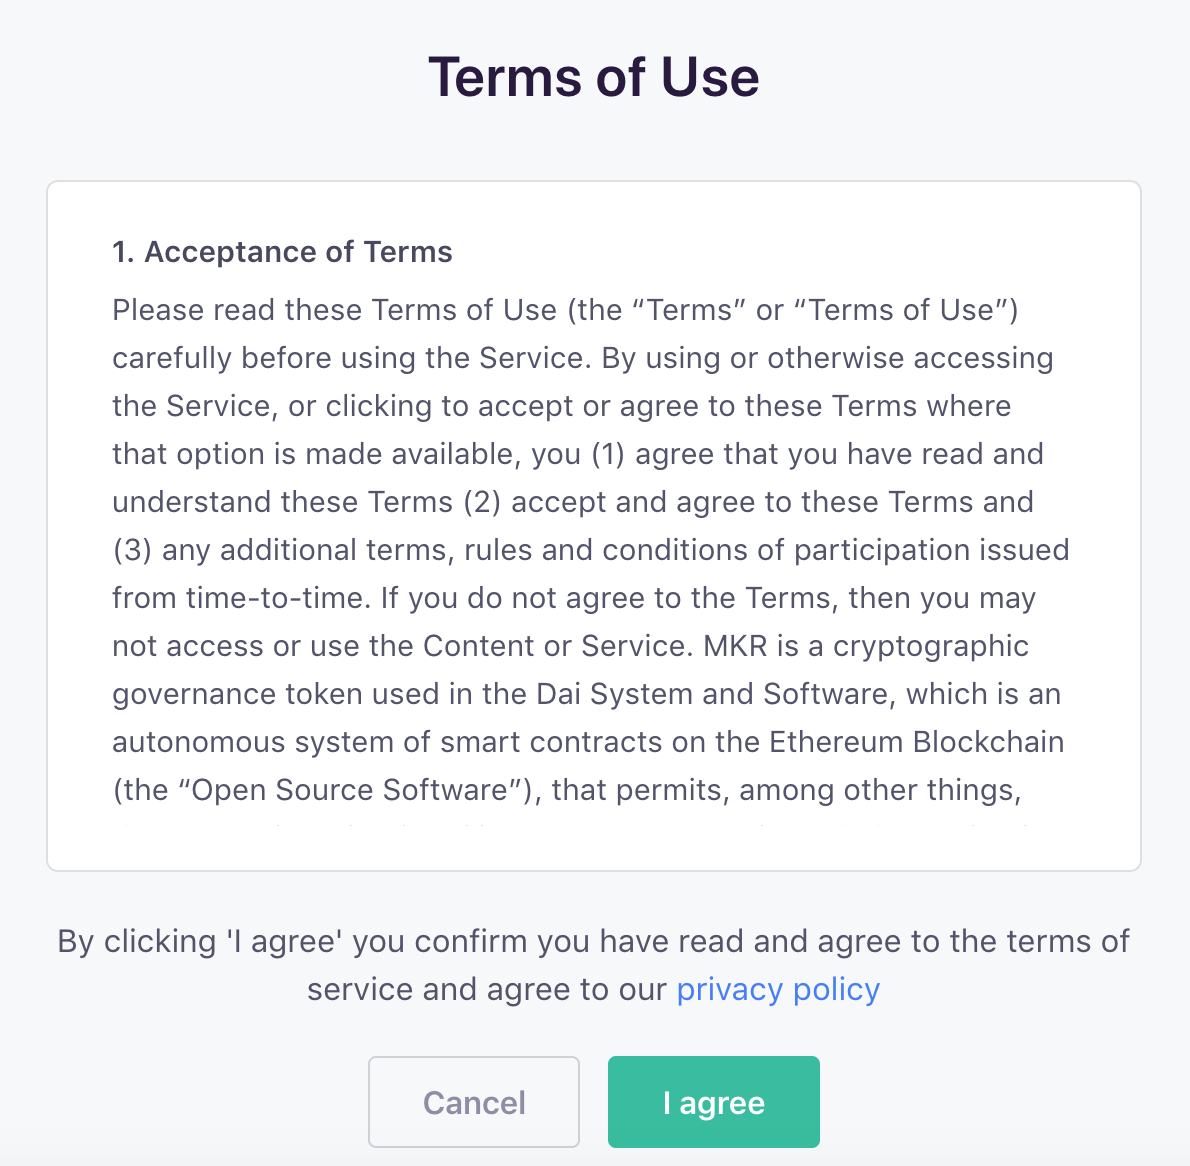
Agree to Terms-of-Use
Select “Vote with a Linked Wallet” from the menu. Read and agree to the “Terms of Use” on the following page.
4
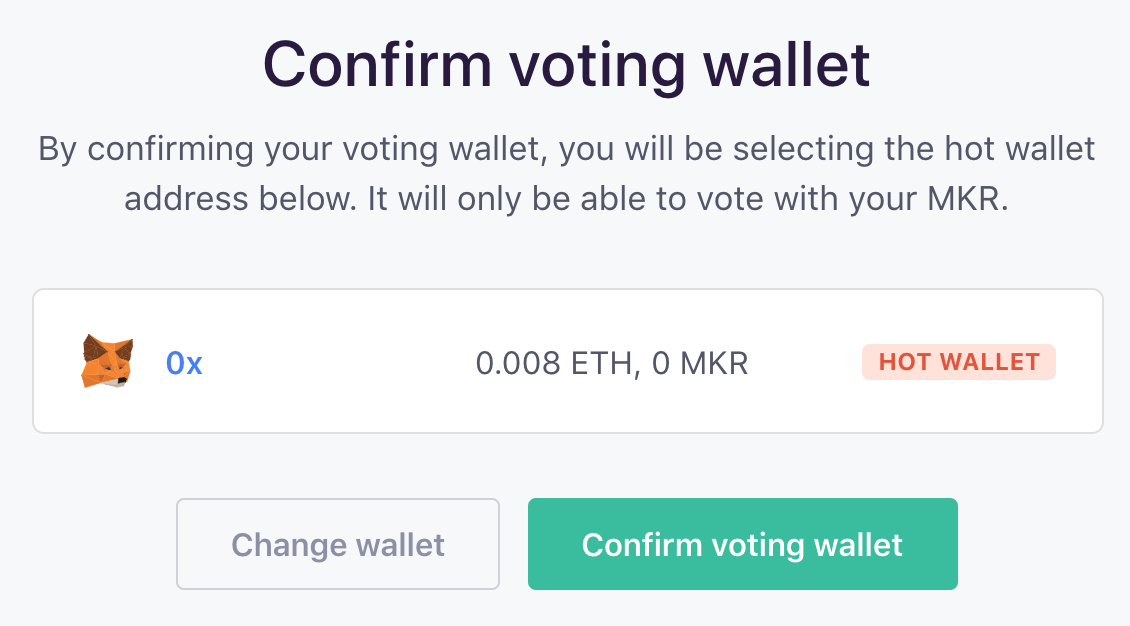
Confirm Voting Wallet
On the following page, select MetaMask as the voting wallet. Click “Connect” to continue and “Confirm Voting Wallet” on the next page.
5
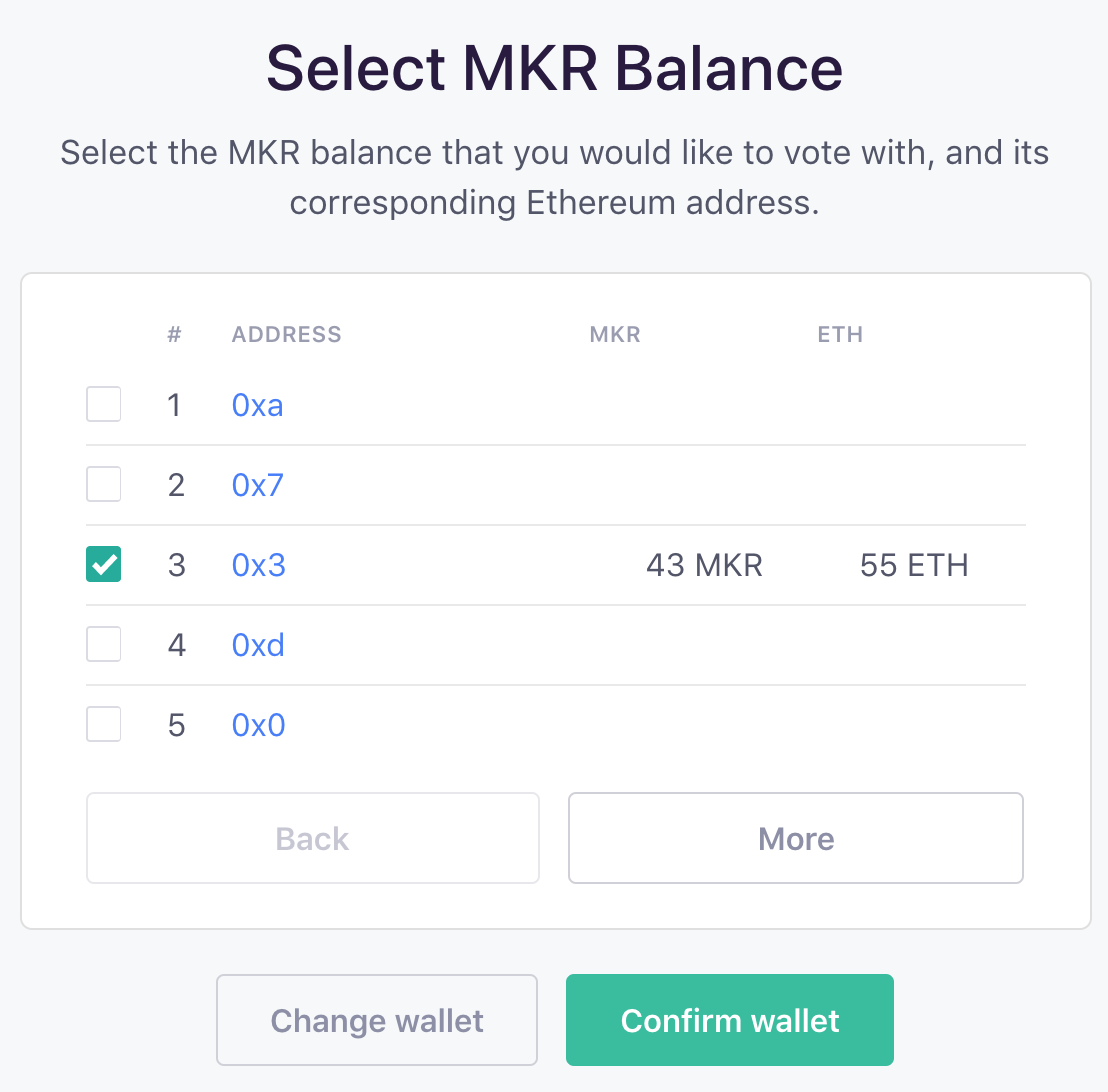
Select a cold wallet
In this case, select the Trezor. Follow the steps to enter the Trezor’s pin and passcode.
When prompted, choose an address with MKR. Click “Confirm Wallet.”
Note: The above step might be skipped if a cold wallet was already selected in the wallet drop-down menu.
6
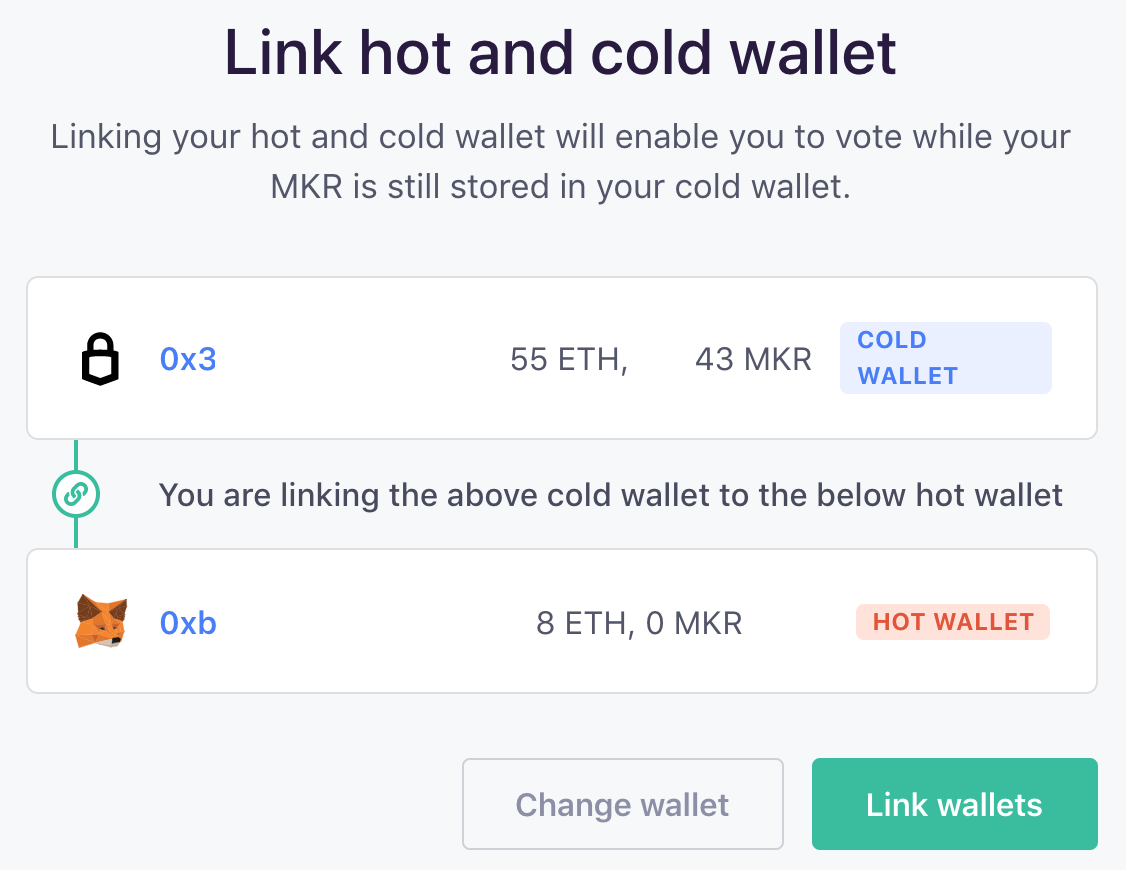
Enable hot wallet voting
Now that the hot and cold wallets are selected, the following step initiates the link to enable hot wallet voting with MKR stored on the cold wallet. Click “Link Wallets.”
7
Sign transactions
Sign transactions on Trezor and MetaMask to confirm the link. Click “Next” each time to continue and follow prompts to approve the transaction.
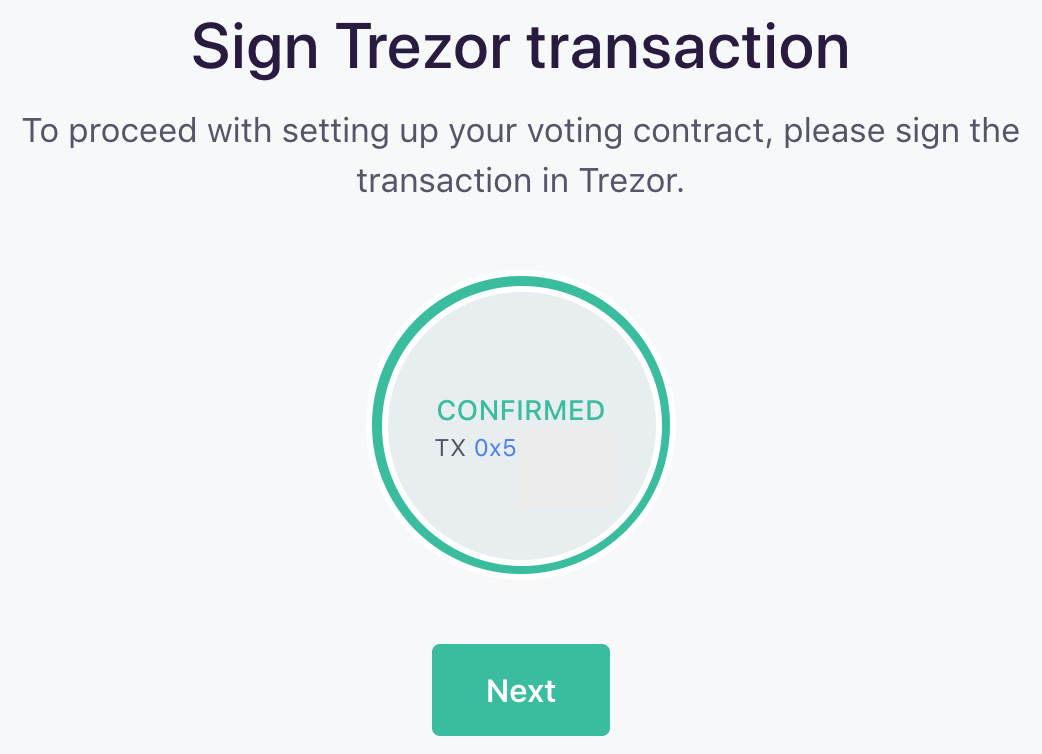

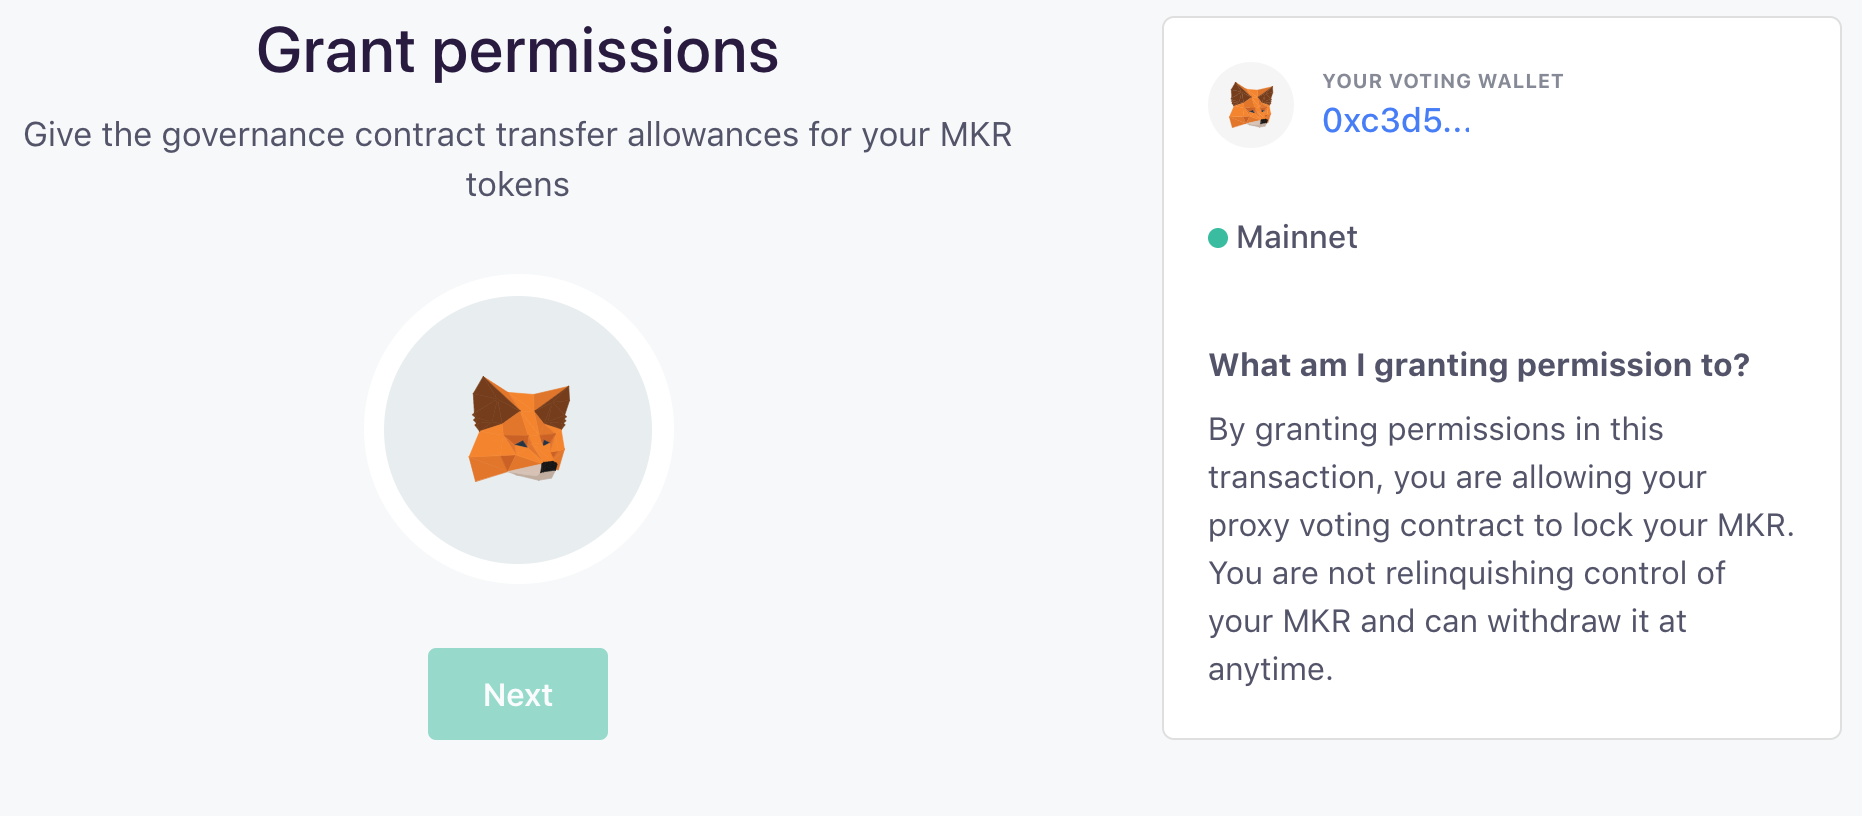
Grant the hot wallet permission to vote with the MKR stored on the cold wallet. Click “Next” and approve the transaction on Trezor.
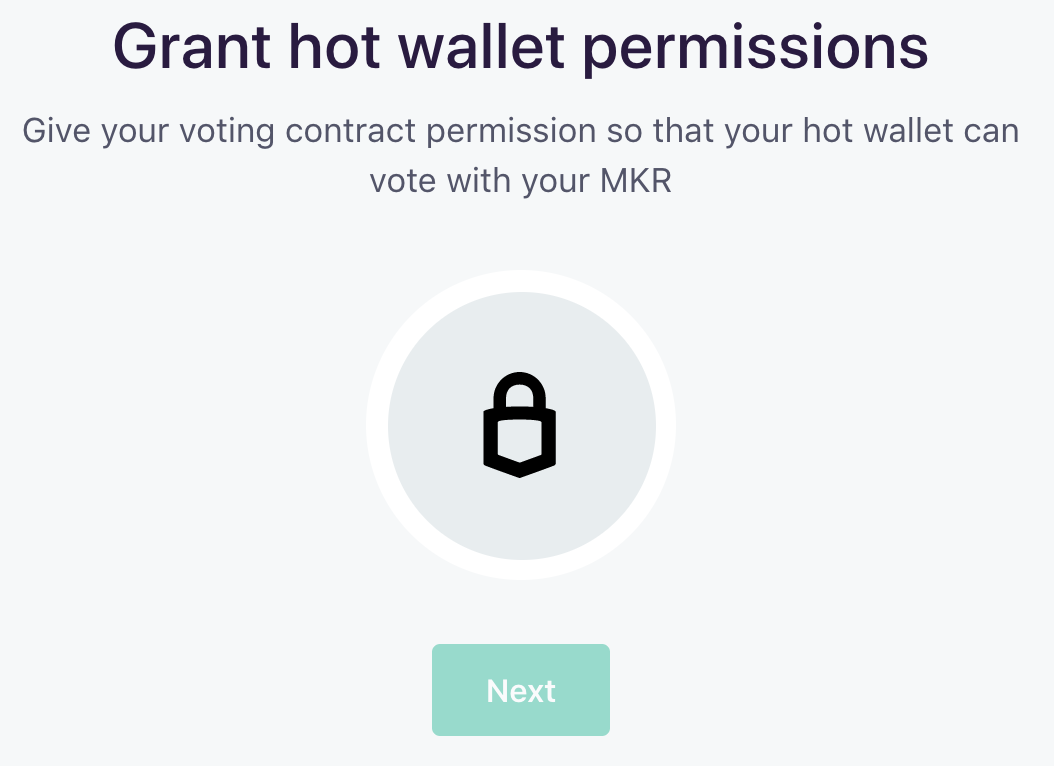
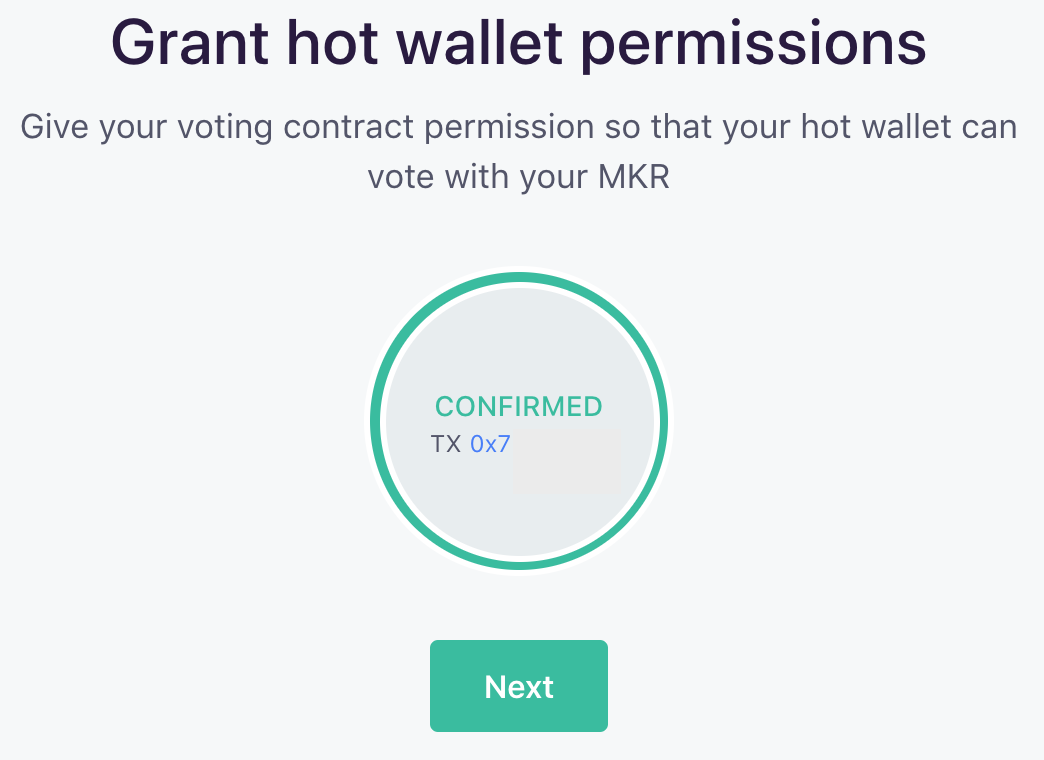
8
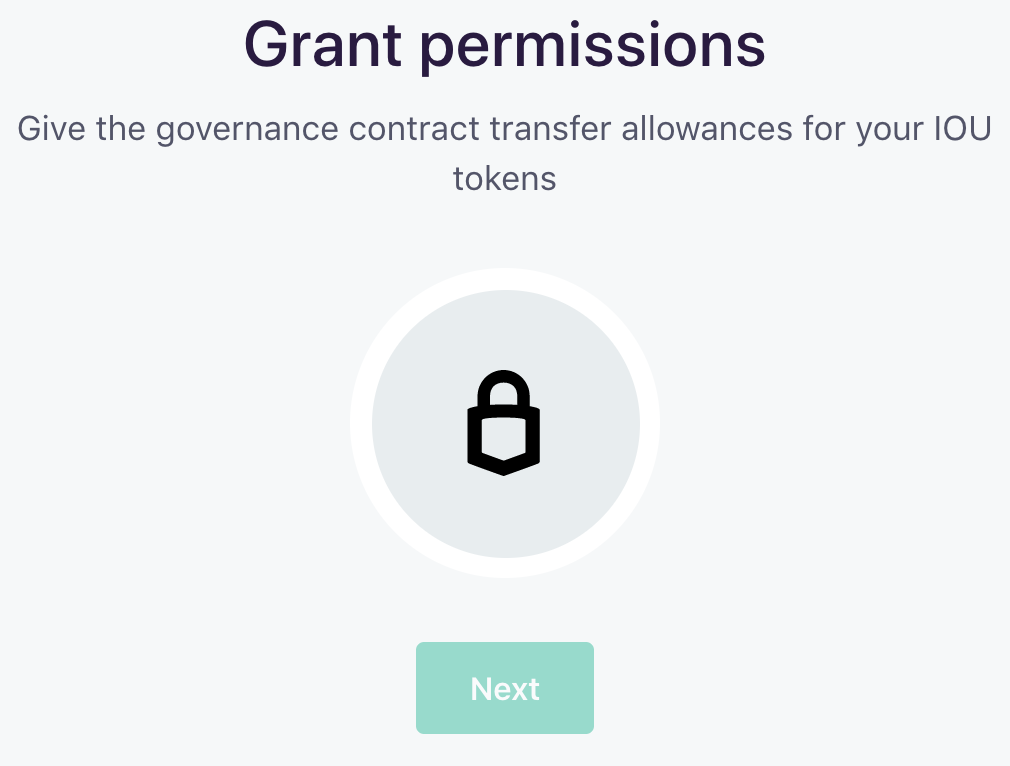
Grant contract transfer allowances
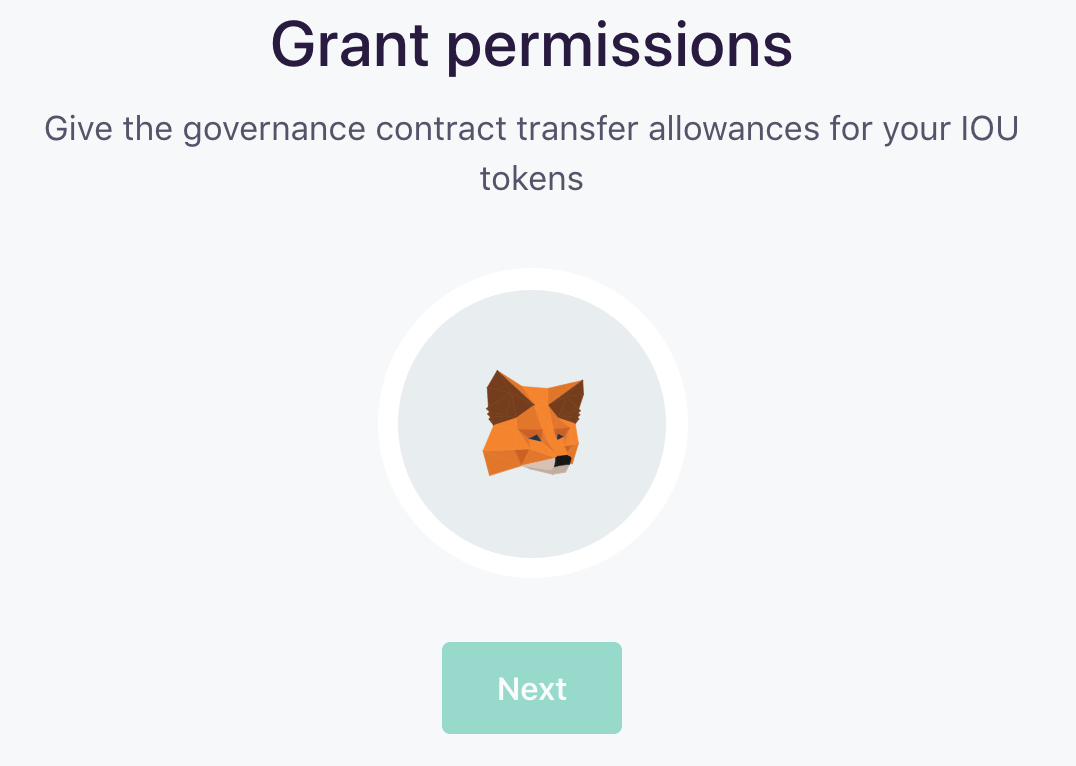
Now, grant the contract transfer allowances for MKR tokens. Click “Next” and confirm the transaction on Trezor.
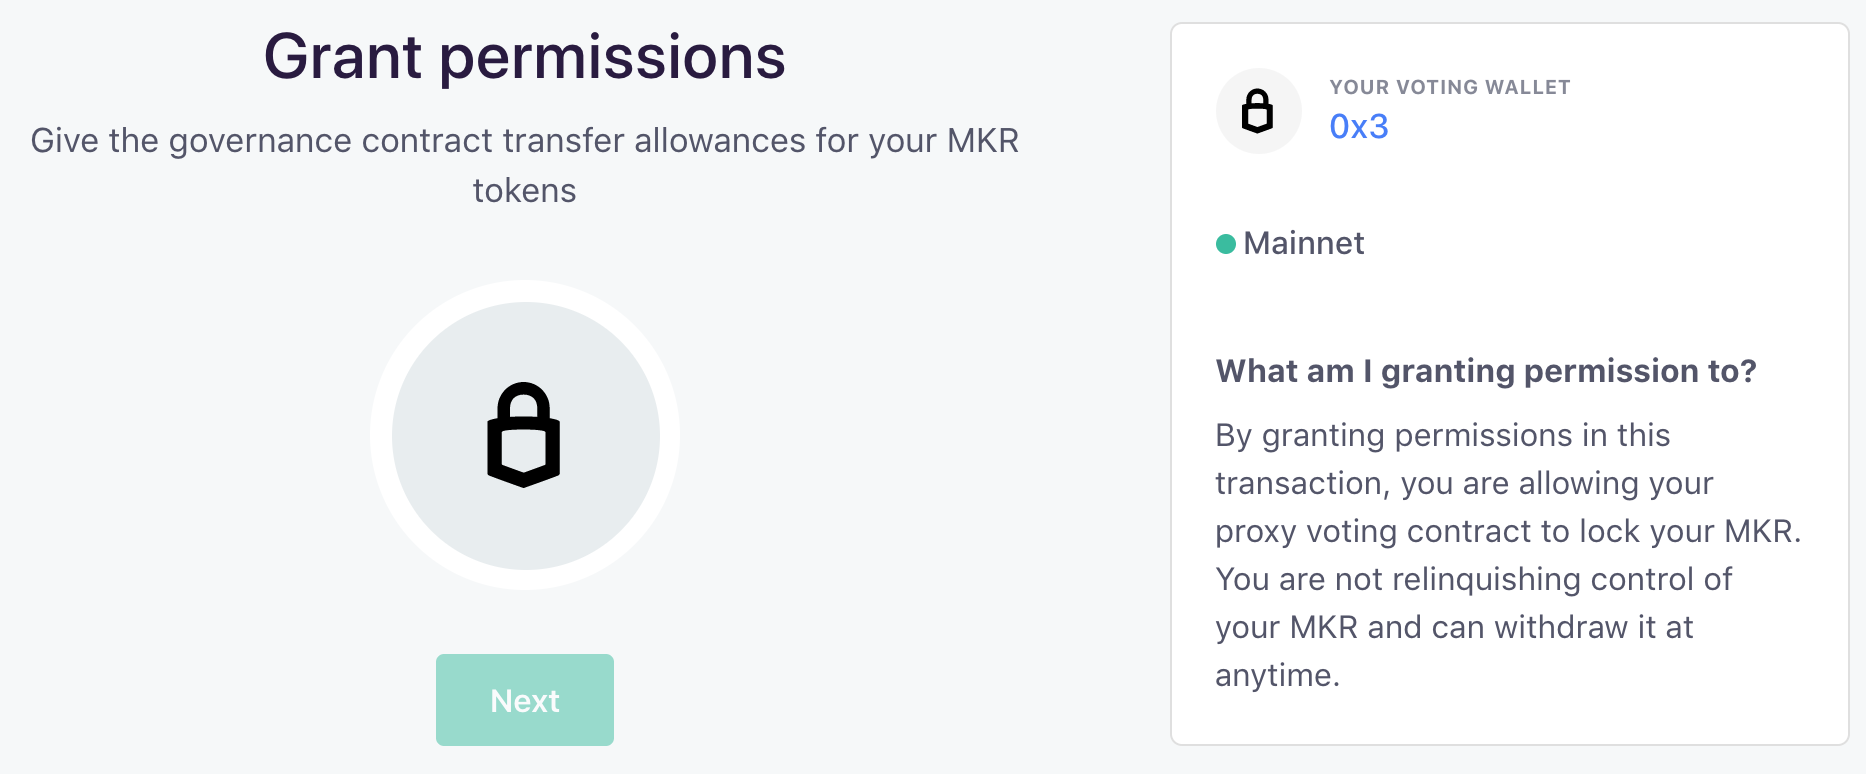
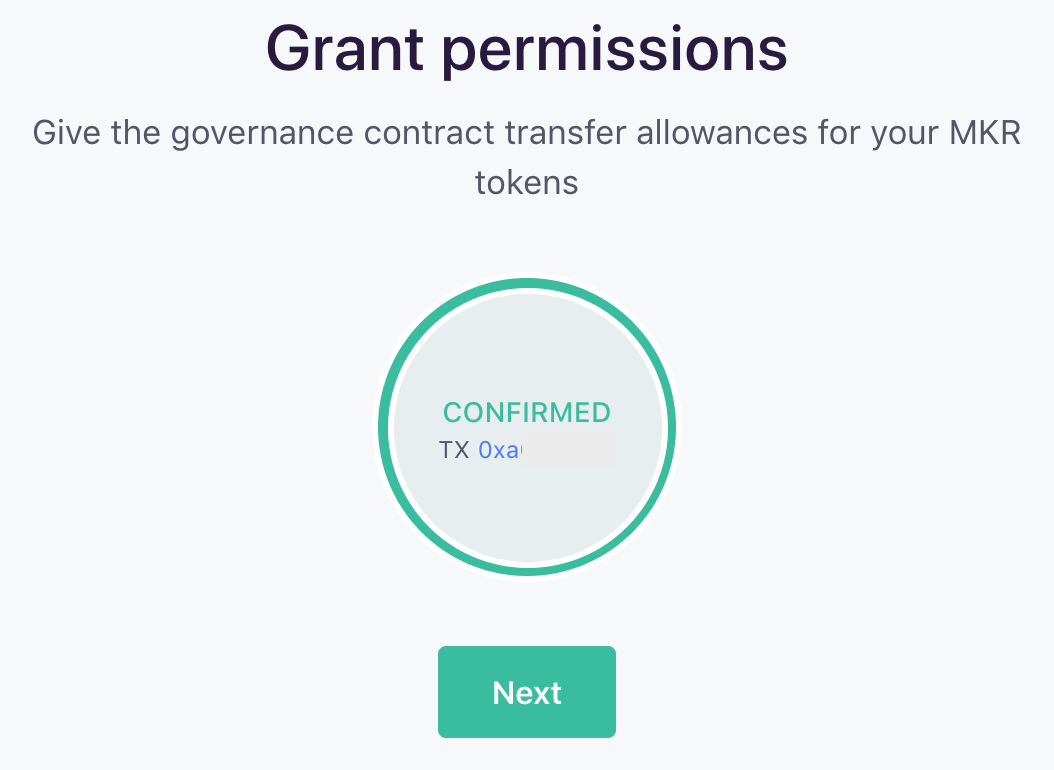
Once the transaction is confirmed, grant the contract transfer allowances for IOU tokens. Click “Next” and confirm the transaction on Trezor.

9
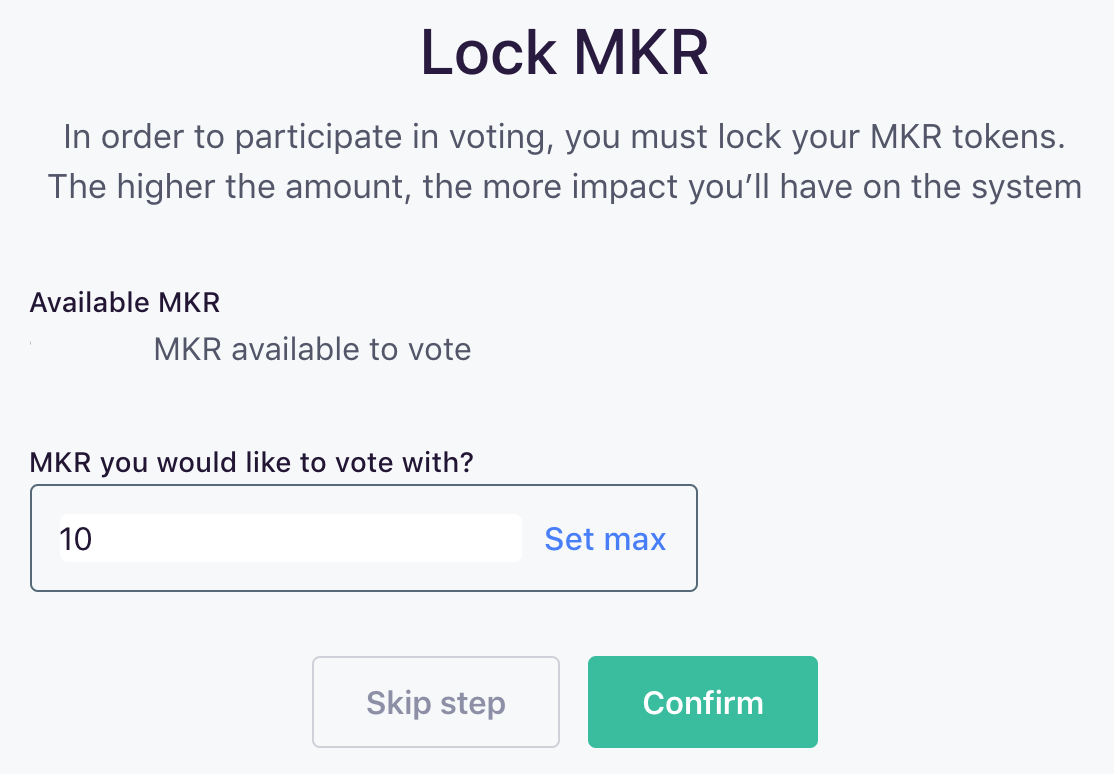
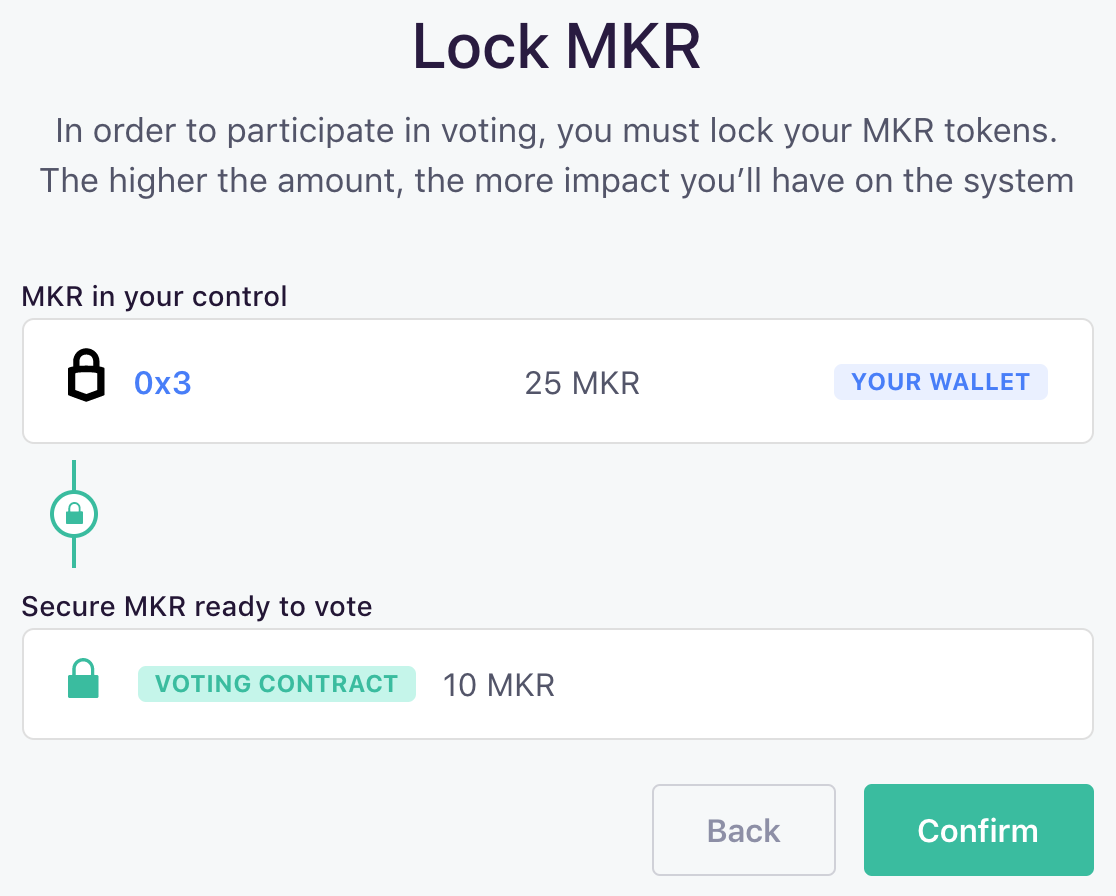
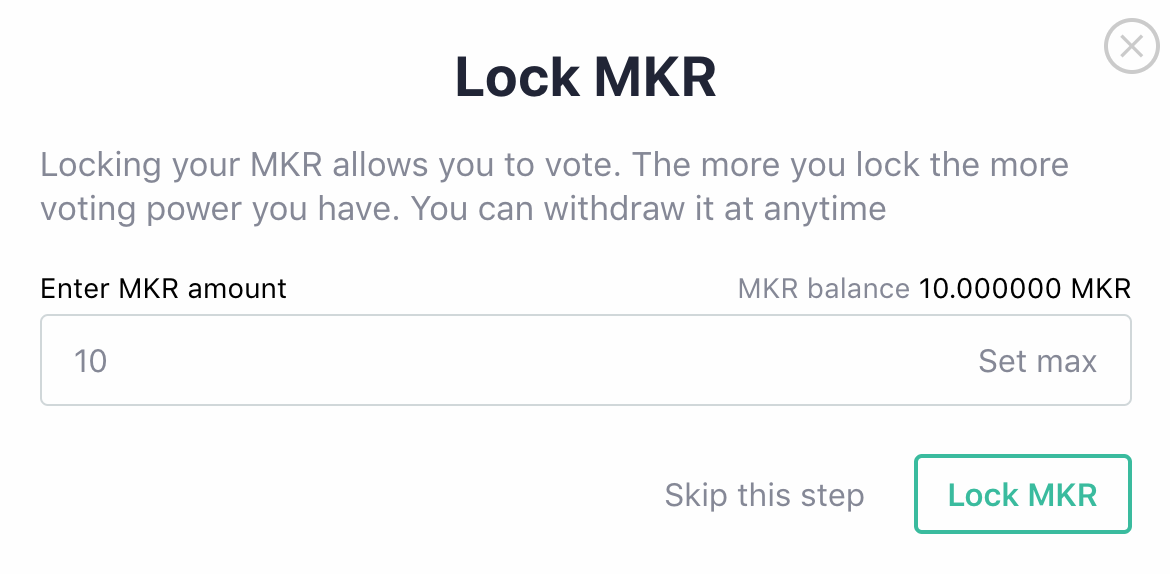
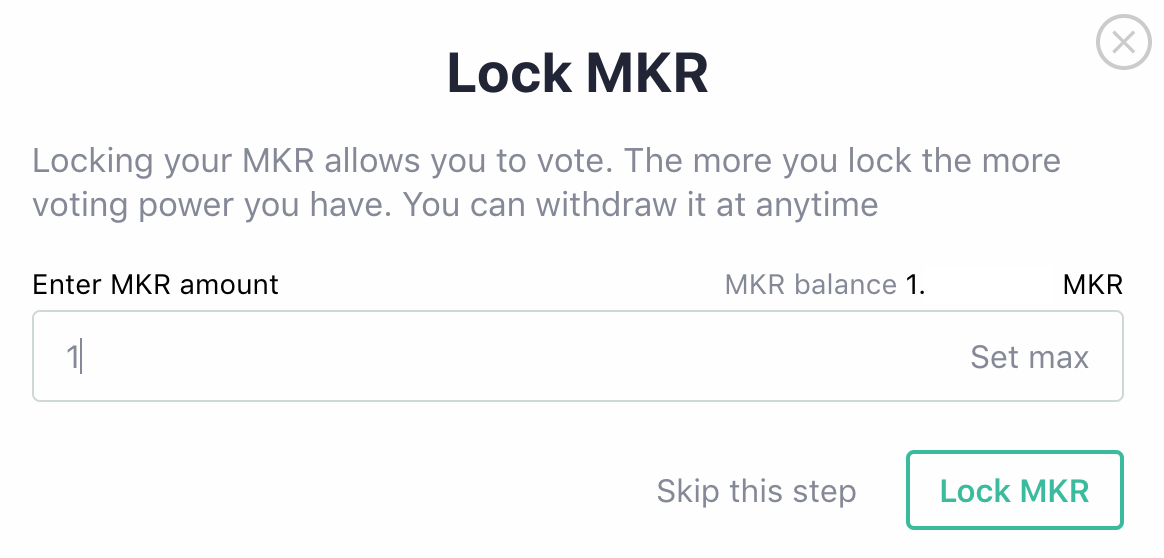
Lock MKR in the voting system
The final step is to “Lock MKR” into the voting system. Users may adjust the amount of MKR in their Voting Contract later by topping-up or withdrawing at any time with a single transaction.
Note: See the end of this section for instructions on how to top-up or withdraw from the voting contract.
Set how much MKR to lock in the contract and click “Confirm.” Always check to make sure the information is correct. Click “Confirm” again and approve the transaction on Trezor.
10
Once the transaction is confirmed, the Voting Contract setup is complete.

Click “Start voting” to return to the main Governance Portal and to participate in Governance Polls and Executive Votes.
Learn more about voting in How Voting Works
Managing the Linked-Wallet Voting Contract
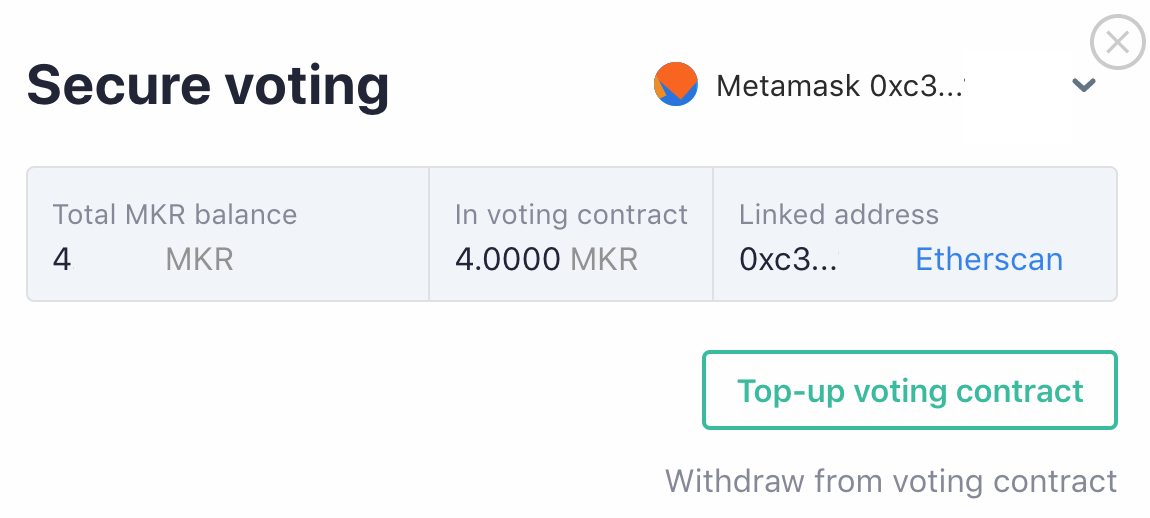
Top-Up Voting Contract
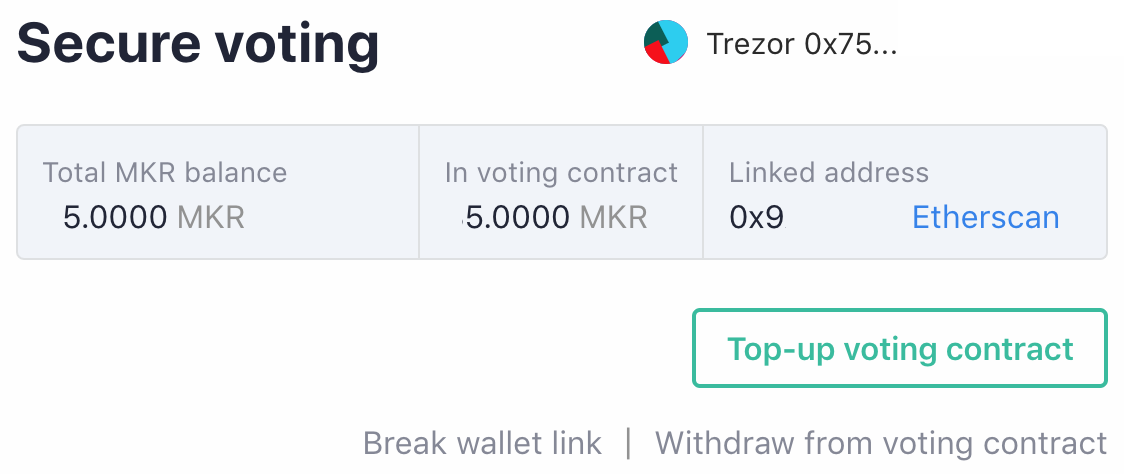
For security reasons, locking additional MKR into the Voting Contract can only be done from the cold wallet, in this case, Trezor.
1
To top-up the Voting Contract, make sure the cold wallet is plugged in. In the Governance Portal, select “Connect to Trezor” from the “Accounts” drop-down menu.
Follow the steps to enter the Trezor’s pin and passcode.
When prompted, select the address that is linked to the Voting Contract.
Click “Unlock Wallet.”
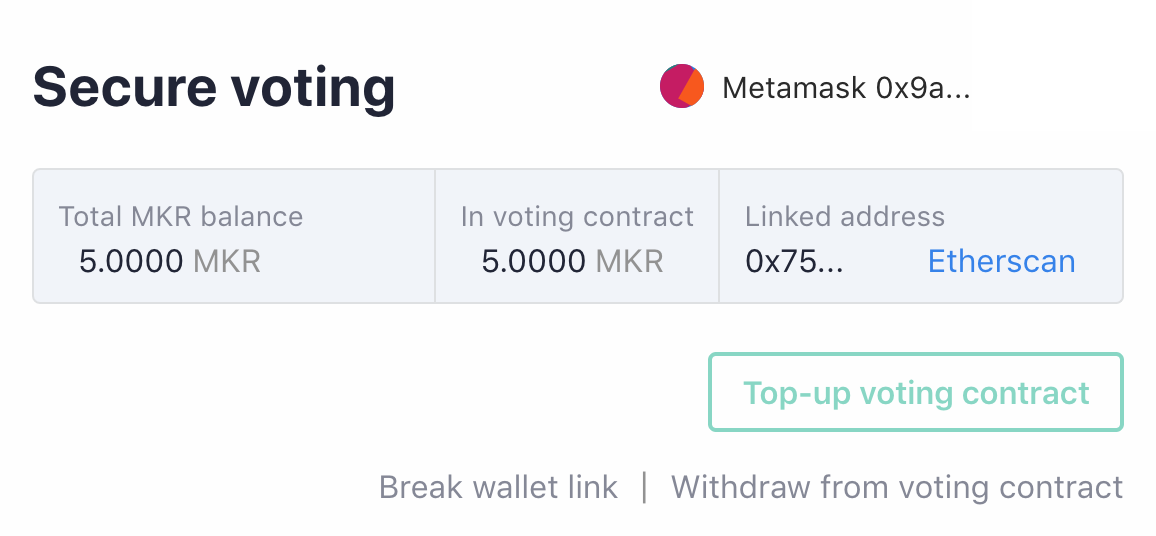
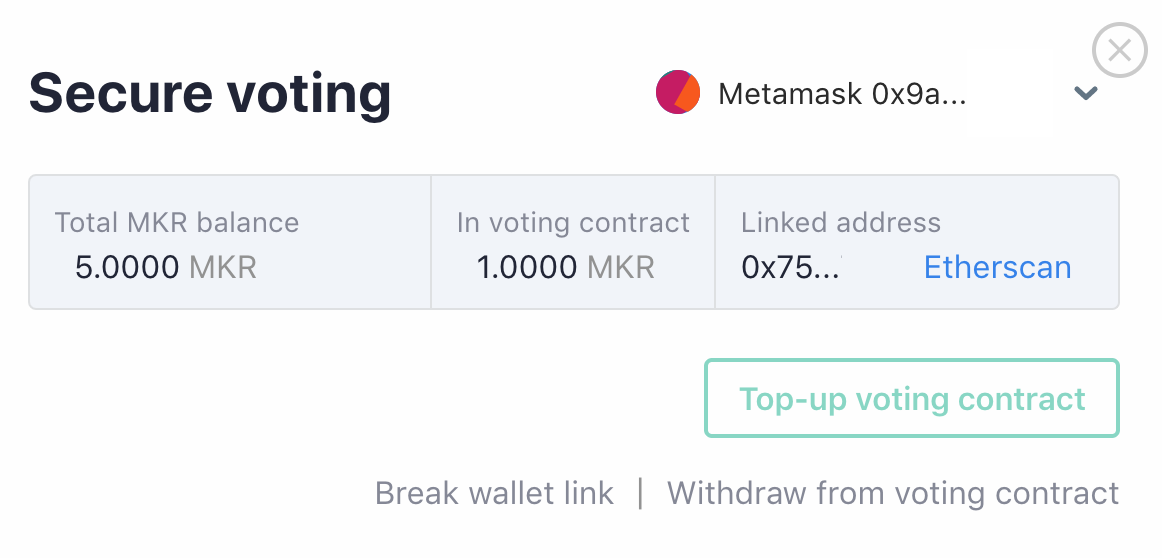
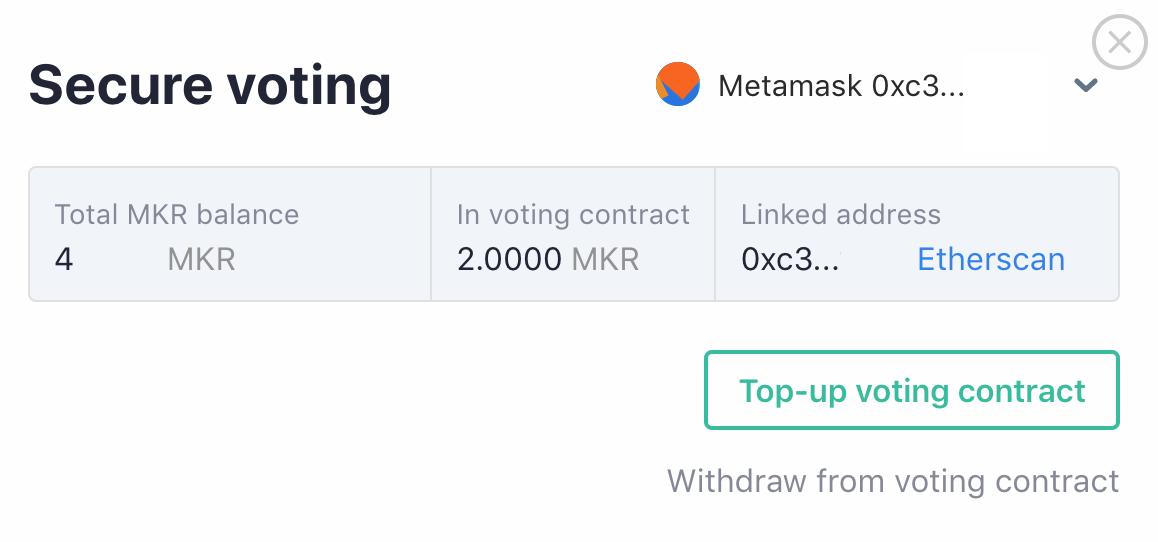
Return to the Governance Portal and click “Voting Contract” to bring up the secure voting menu. Select “Top-Up Voting Contract.”

Enter the MKR amount to add to the contract and click “Lock MKR.”
Approve the transaction on Trezor.
2
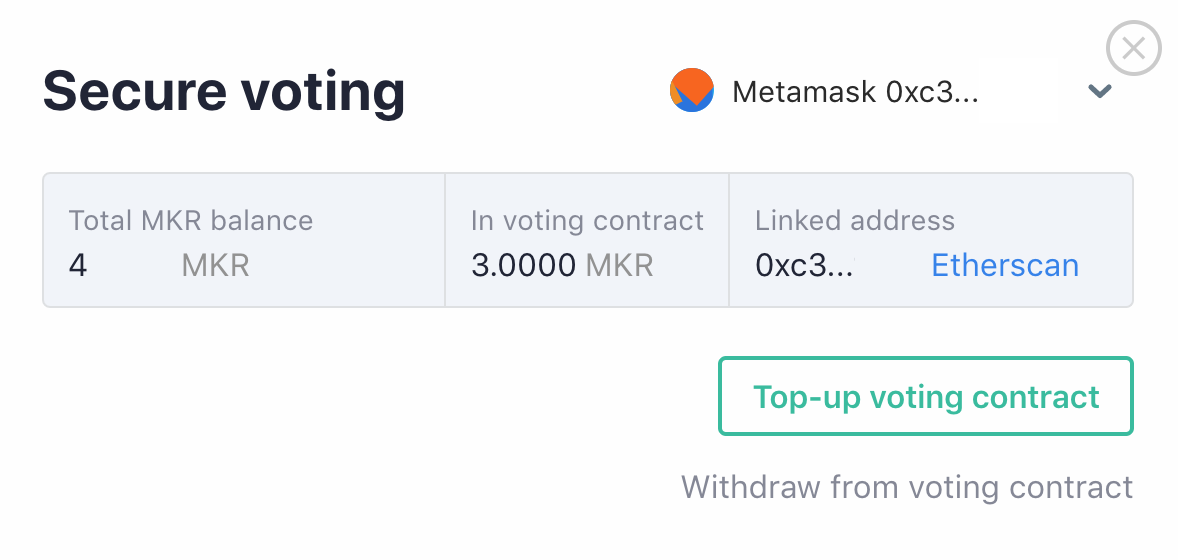
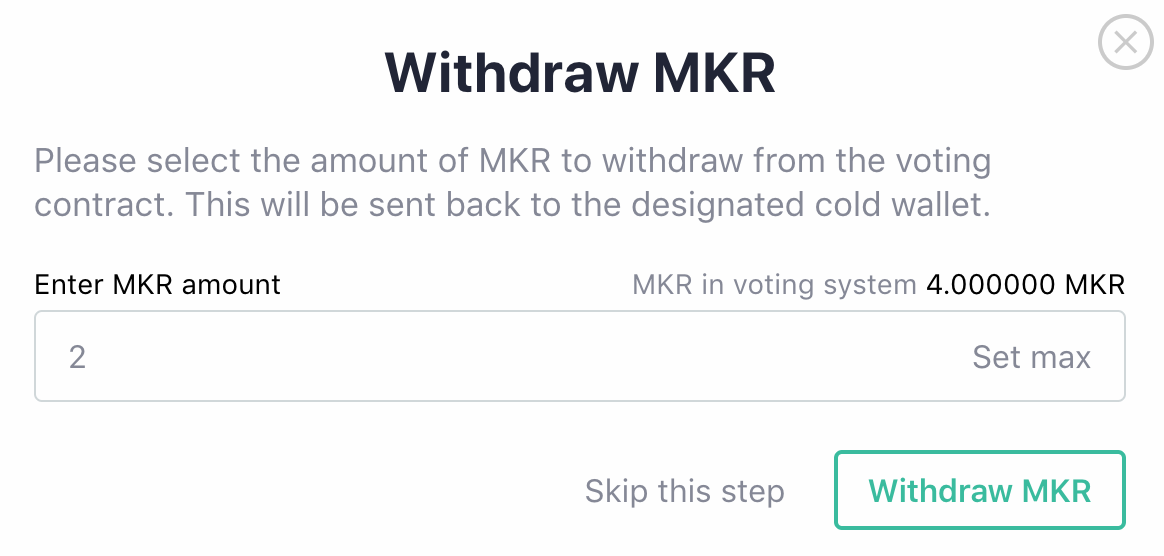
Withdraw MKR from Voting Contract
Use either wallet to withdraw MKR from the Voting Contract and return the tokens to the cold wallet. For this example, the MetaMask hot wallet will withdraw the locked MKR. The process is similar when using a cold wallet.
Make sure MetaMask is running, and the account associated with the contract is selected. On the Governance Portal, click “Voting Contract” to bring up the secure voting menu. Select “Withdraw from Voting Contract.”
Enter the MKR amount to withdraw from the contract and click “Withdraw MKR.” Approve the transaction on MetaMask.
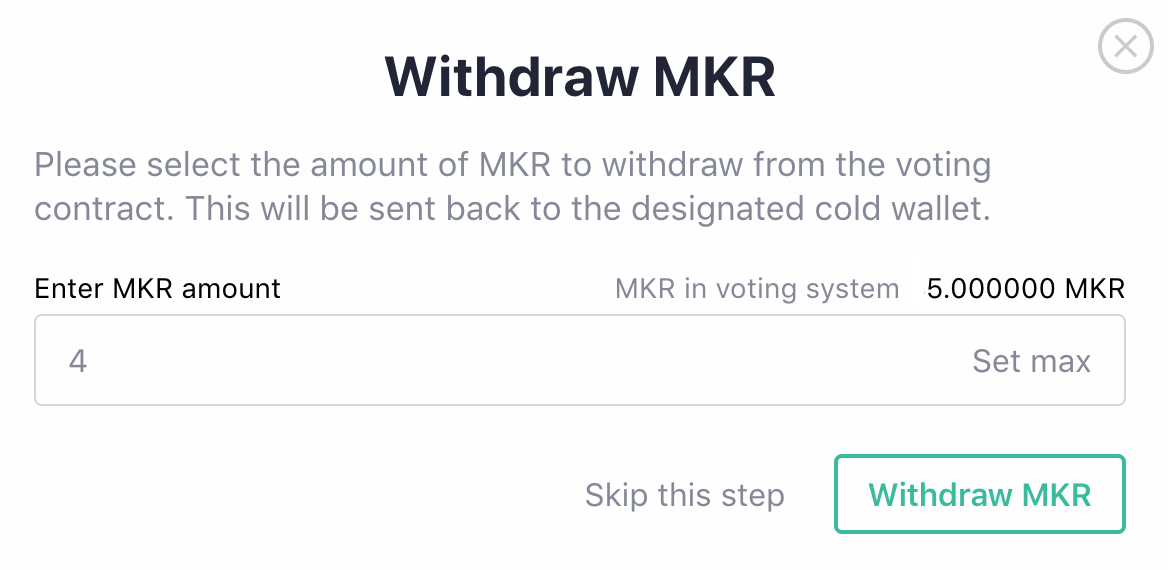
Once the transaction is confirmed, unlocked MKR returns to the cold wallet, and the contract manager reappears. The MKR balance in the voting contract will update to reflect the changes.
3
Break Wallet Link
The wallet link can be broken from either the cold or the hot wallet, in turn, closing the contract. In case the hot wallet is compromised, the cold wallet can safely withdraw MKR from the contract before breaking the link.
Note: All MKR must be withdrawn before the link can be broken. Follow the instructions above to withdraw all MKR from the contract.
For this example, the cold wallet will break the wallet link. On the Governance Portal, click “Connect to Trezor” from the “Accounts” drop-down menu and connect to the Voting Contract’s cold wallet address.
Return to the Governance Portal and click “Voting Contract” to bring up the secure voting menu. Select “Break Wallet Link.”
If not done already, follow the prompt to withdraw any remaining locked MKR.
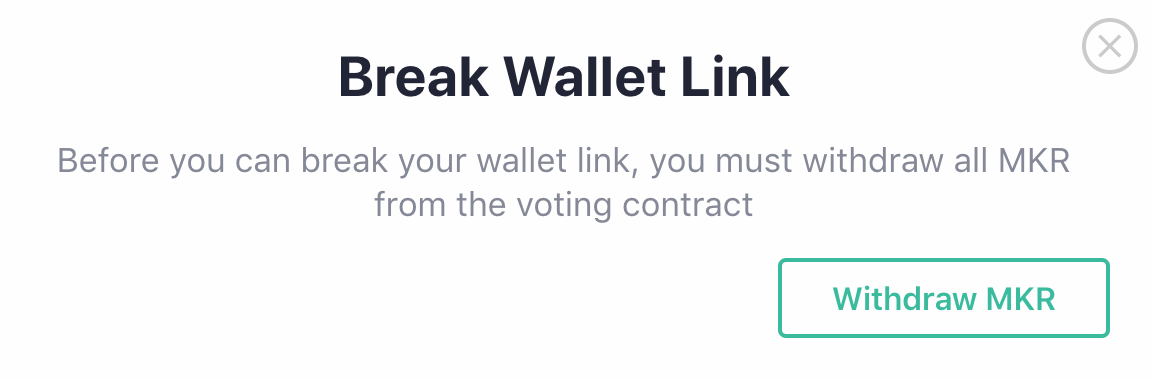
Otherwise, click “Break Link” to close the contract. Confirm the transaction on the cold wallet.
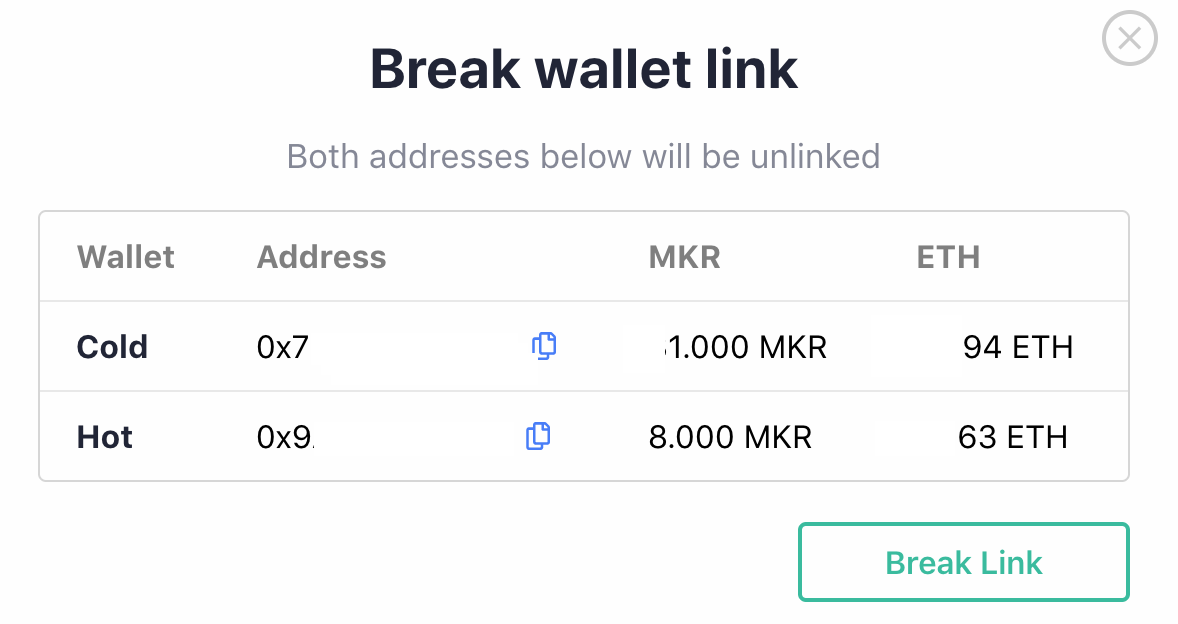
Once the transaction is confirmed, the link is broken, and the voting contract is closed. To vote again, return to the Governance Portal to set up a new voting contract.
Single Wallet Setup
Prefer to watch a video? Check out the Single Wallet Contract Setup.
1
Sync MetaMask
To set up a Single Wallet Voting Contract, make sure the MetaMask browser extension is installed and running.
Navigate to the Governance Portal. Find the “Accounts” drop-down menu on the right side of the top banner. Select the appropriate account to use as the contract wallet.

Select “Set Up Now” on the highlighted section of the front-page to start the Voting Contract setup.

Select “Vote with a Single Wallet” from the menu. Read and agree to the “Terms of Use” on the following page.


2
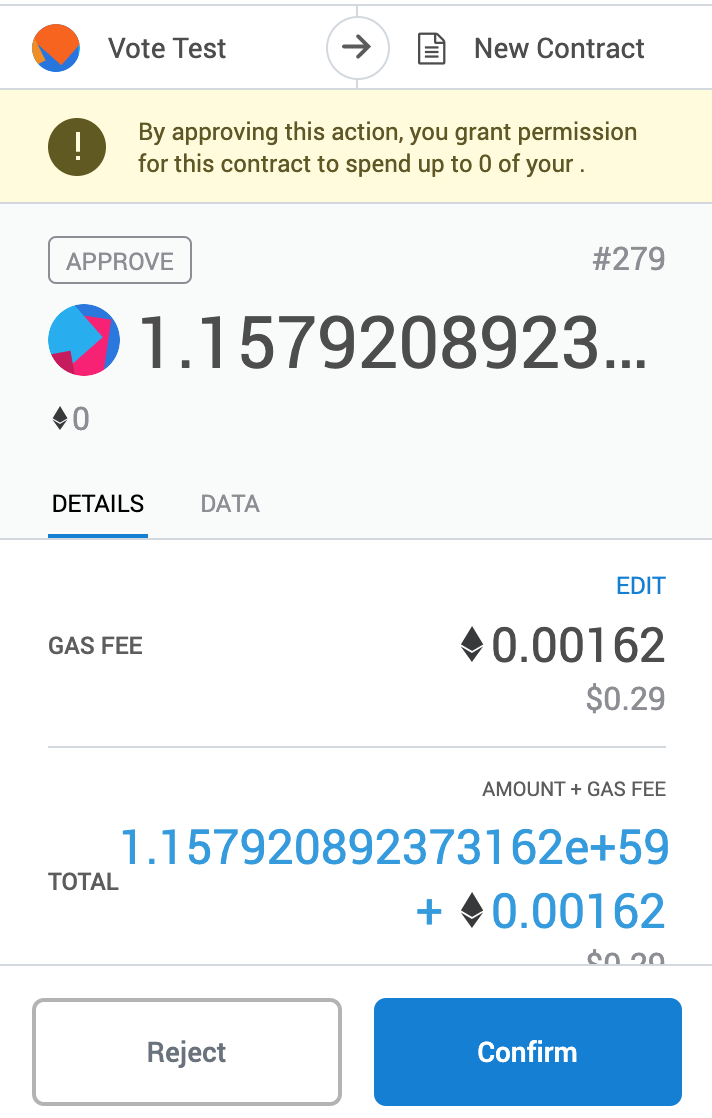
Grant permissions
The next page will ask to “Grant Permissions.” This grants the contract the ability to move MKR tokens. Confirm the transaction on MetaMask.
Click “Next” once the transaction is confirmed. The next page will grant the contract transfer allowances for IOU tokens. Confirm the transaction on MetaMask.
3
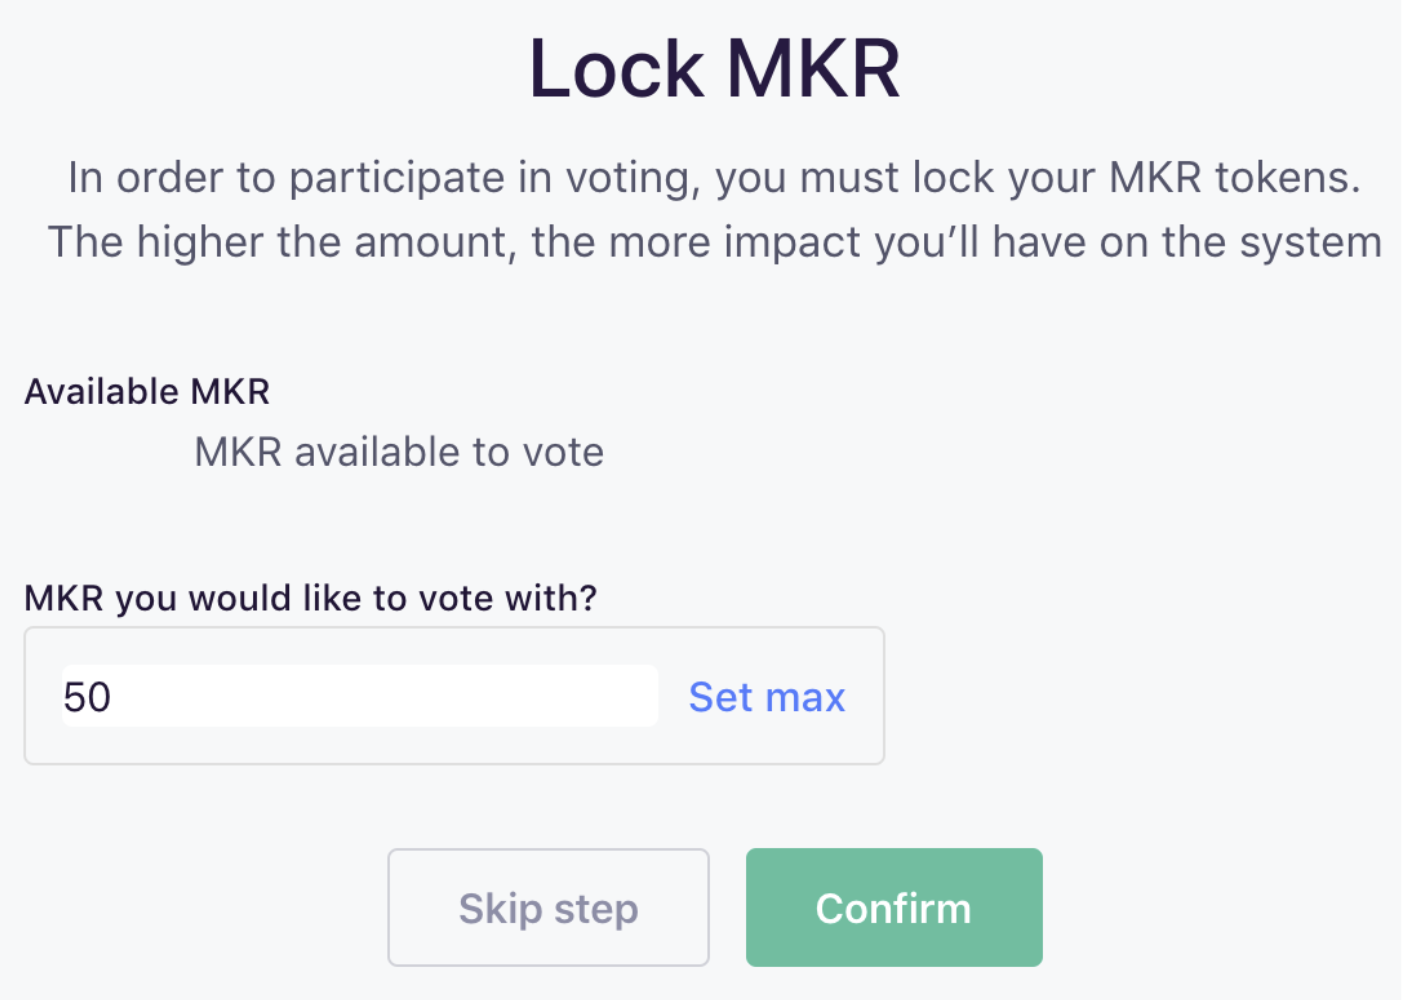
Lock MKR in the voting system
Set how much MKR this contract will hold. A contract voting with more MKR has a more significant impact on the system.
Lock in more MKR to\ the Voting Contract or withdraw locked MKR at any time in a single transaction.
Note: See the end of this section for instructions on how to top-up the contract, withdraw MKR, or break the wallet contract.
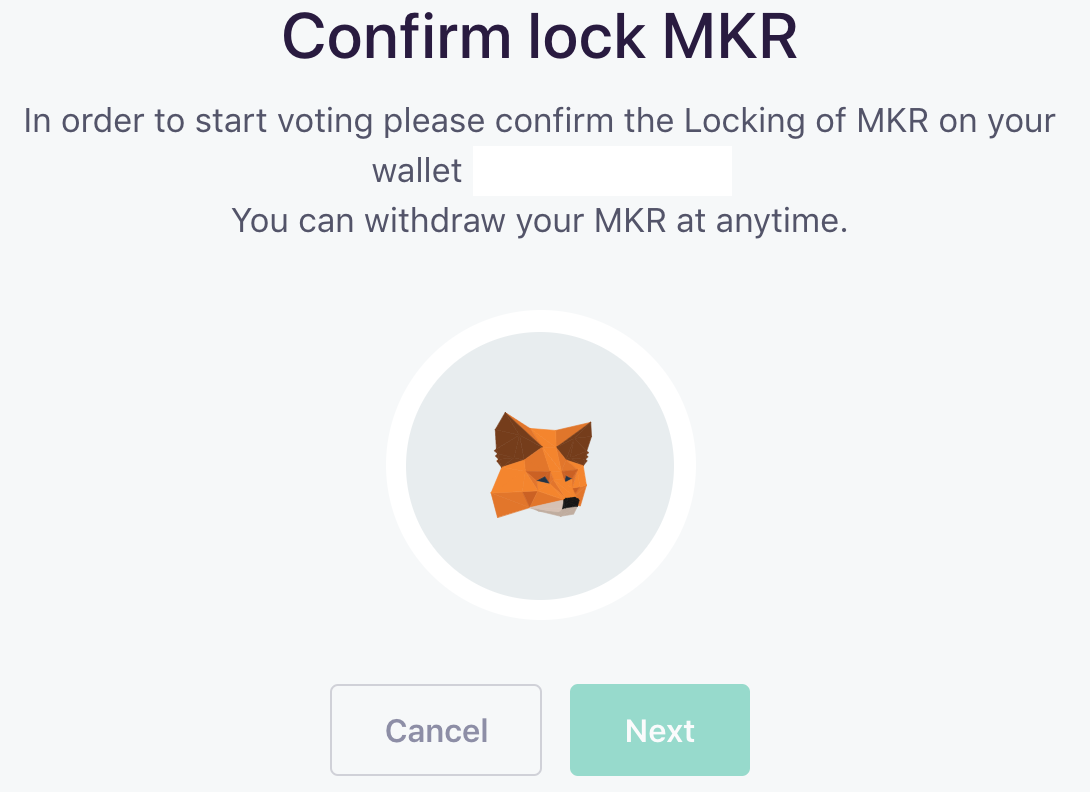
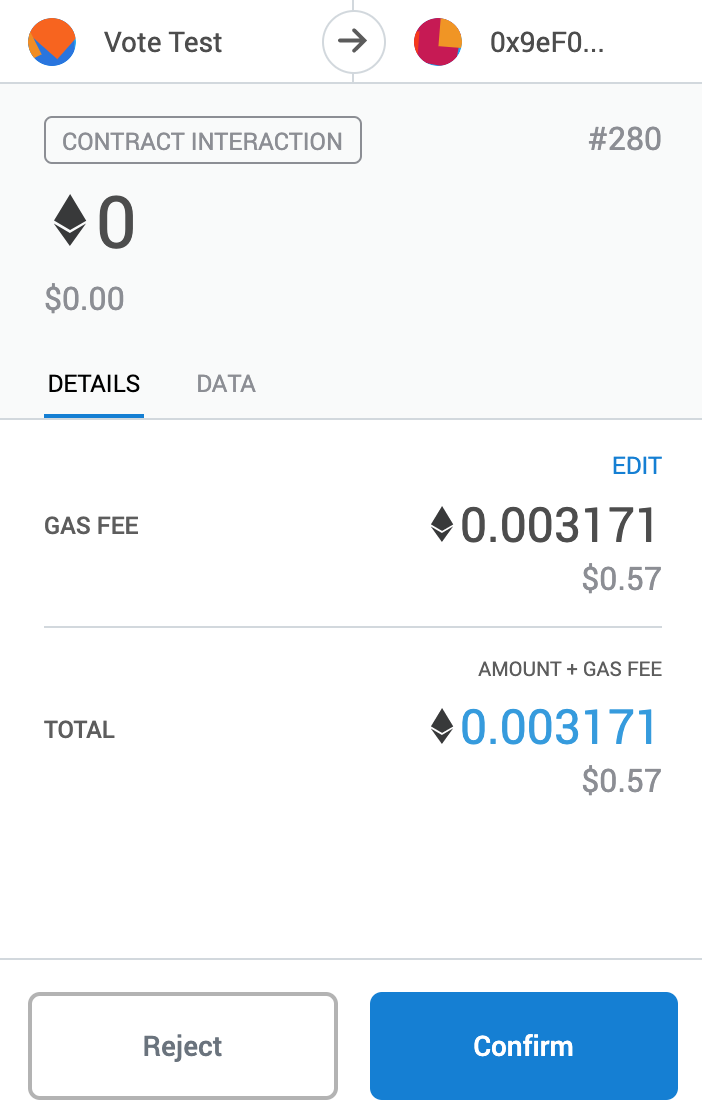
Click “Confirm” and check to make sure the information is correct. “Confirm” again and approve the transaction on MetaMask.

4
Setup complete
Once MKR is locked in the contract, the Voting Contract setup is complete.
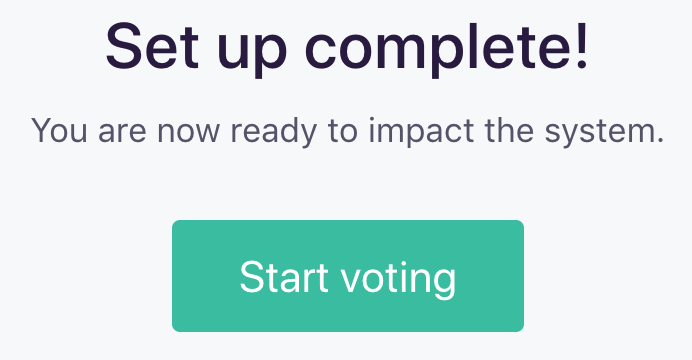
Click “Start Voting” to return to the main Governance Portal to participate in Governance Polls and Executive Votes.
To begin voting, skip ahead to the Voting Process section.
Managing the Single-Wallet Voting Contract
1
Top-Up Voting Contract
To add MKR to a Single Wallet Voting Contract, make sure MetaMask is running, and the account associated with the contract is selected.
In the Governance Portal, click “Voting Contract” to bring up the secure voting menu. Select “Top-Up Voting Contract.”

Enter the MKR amount to add to the contract and click “Lock MKR.” Approve the transaction on MetaMask.
Once the transaction is confirmed, the contract manager will reappear. The MKR balance in the voting contract will update to reflect the changes.
2
Withdraw MKR from Voting Contract
To withdraw MKR from a Single Wallet Voting Contract, make sure MetaMask is running, and the account associated with the contract is selected.
In the Governance Portal, click “Voting Contract” to bring up the secure voting menu. Select “Withdraw from Voting Contract.”
Enter the MKR amount to withdraw from the contract and click “Withdraw MKR.” Approve the transaction on MetaMask.
Once the transaction is confirmed, unlocked MKR returns to the wallet, and the contract manager reappears. The MKR balance in the voting contract will update to reflect the changes.
3
Close Voting Contract
For a Single Wallet Voting Contract, breaking a link is not required. To close the contract, simply withdraw all MKR back to the wallet.
To vote with the same wallet later, return to the Voting Contract manager to top-up locked MKR. The wallet will retain contract permissions. Repeating the setup process is not necessary.